안드로이드에서 웹서버에 post로 글쓰기(by wono77)
최초문서작성: 2010년 10월 4일
글공개 : 2012년 4월 6일
미투데이처럼 안드로이드에서 글을 쓰면,
웹서버는 어떻게 그 내용을 받아내서 db에 올려야 할까?
꽤 오래전부터 궁금했었는데, 계획만 있을뿐 제대로 공부해보지를 못하고 있었다.
드디어 시간이 나서 그 방법을 찾아보고 개발을 해보았다.
코드설명:
안드로이드 코드상에서 간단히 id, pass를 post 방식으로 쓰고,
웹서버는 php를 사용하였다.
php에서 받은 글을 txt로 저장한 후, echo로 결과를 쓴다.
그러면, 안드로이드는 그 웹서버의 echo를 받아서 에뮬 화면에 작성하는 코드이다.
실행화면:
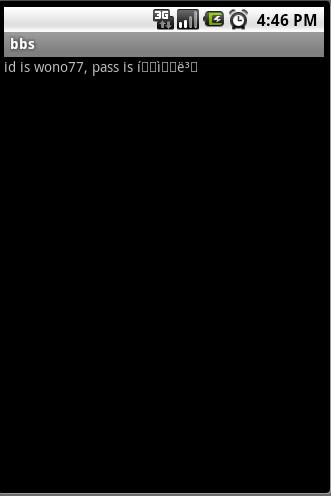
안드로이드에서 올린 글을 받아내서 반응하는 php 코드:
php가 안드로이드의 글을 받았는지 서버단에서의 확인을 하기 위해,
db에 연결하지 않고 일단 간단히 반응이 오면 파일을 작성해보았다.
<?
$id=$_REQUEST[id];
//echo("id: ".$id);
$pass=$_REQUEST[pass];
//echo("pass: ".$pass);
$imgpath = "/home/hosting_users/radstyle/www";
$fp=fopen($xmlpath."./test.txt",'w');
fwrite($fp,$id);
fwrite($fp,"\n");
fwrite($fp,$pass);
fclose($fp);
echo("id is $id, pass is $pass");
if(file_exists($fp)){
if(sizeof($fp)>0){
echo("id is $id, pass is $pass");
}else{
echo("file size is zero");
}
}
?>
위 코드가 잘 반응하는지 웹에서 확인하기 위한 코드는 아래와 같다.
get 방식으로 테스트하려면,
http://radstyle.net/loginTest.php?id=aaaa&pass=1111 만으로 될 것이다.
(추가로 php 파일 업로드 폼도 작성해볼 것)
<?
echo("loginTest");
?>
<form action="loginTest.php" method="post" >
<input type=text name=id>
<input type=submit>
</form>
안드로이드 코드(파일첨부함):
package com.bbs.www;
import java.io.IOException;
import java.io.UnsupportedEncodingException;
import java.util.ArrayList;
import java.util.List;
import java.util.Vector;
import org.apache.http.HttpEntity;
import org.apache.http.HttpResponse;
import org.apache.http.NameValuePair;
import org.apache.http.client.ClientProtocolException;
import org.apache.http.client.HttpClient;
import org.apache.http.client.ResponseHandler;
import org.apache.http.client.entity.UrlEncodedFormEntity;
import org.apache.http.client.methods.HttpPost;
import org.apache.http.impl.client.BasicResponseHandler;
import org.apache.http.impl.client.DefaultHttpClient;
import org.apache.http.message.BasicNameValuePair;
import org.apache.http.protocol.HTTP;
import android.app.Activity;
import android.os.Bundle;
import android.widget.TextView;
public class bbs extends Activity {
/** Called when the activity is first created. */
@Override
public void onCreate(Bundle savedInstanceState) {
super.onCreate(savedInstanceState);
setContentView(R.layout.main);
TextView resultField = ( TextView ) findViewById( R.id.result ) ;
// try {
// downloadUrl("http://radstyle.net/sexfa.php", "최원효");
// } catch (UnsupportedEncodingException e) {
// // TODO Auto-generated catch block
// e.printStackTrace();
// }
try {
resultField.setText(sendData("wono77", "하얀별"));
} catch (UnsupportedEncodingException e) {
// TODO Auto-generated catch block
e.printStackTrace();
} catch (ClientProtocolException e) {
// TODO Auto-generated catch block
e.printStackTrace();
} catch (IOException e) {
// TODO Auto-generated catch block
e.printStackTrace();
}
}
private String sendData(String id, String pwd)
throws ClientProtocolException, IOException {
// TODO Auto-generated method stub
HttpPost request = makeHttpPost(id, pwd,
"http://radstyle.net/loginTest.php");
// Get 방식일경우
// HttpPost request = makeHttpGet( id, pwd,
// "http://www.shop-wiz.com/android_post.php" ) ;
HttpClient client = new DefaultHttpClient();
ResponseHandler<String> reshandler = new BasicResponseHandler();
String result = client.execute(request, reshandler);
return result;
}
// Post 방식일경우
private HttpPost makeHttpPost(String user_id, String user_pwd, String url) {
// TODO Auto-generated method stub
HttpPost post = new HttpPost(url);
Vector<NameValuePair> params = new Vector<NameValuePair>();
params.add(new BasicNameValuePair("id", user_id));
params.add(new BasicNameValuePair("pass", user_pwd));
post.setEntity(makeEntity(params));
return post;
}
private HttpEntity makeEntity(Vector<NameValuePair> params) {
HttpEntity result = null;
try {
//result = new UrlEncodedFormEntity( params ) ;
result = new UrlEncodedFormEntity(params, HTTP.UTF_8);
} catch (UnsupportedEncodingException e) {
// TODO Auto-generated catch block
e.printStackTrace();
}
return result;
}
//다른 방식
private void downloadUrl(String postURL, String input)
throws UnsupportedEncodingException {
try {
HttpClient client = new DefaultHttpClient();
HttpPost post = new HttpPost(postURL);
List<NameValuePair> params = new ArrayList<NameValuePair>();
params.add(new BasicNameValuePair("name", input));
UrlEncodedFormEntity ent = new UrlEncodedFormEntity(params,
HTTP.UTF_8);
post.setEntity(ent);
HttpResponse responsePOST = client.execute(post);
HttpEntity resEntity = responsePOST.getEntity();
} catch (Exception e) {
e.printStackTrace();
}
}
}
* 남은 문제:
encoding UTF8을 하여 서버에 한글을 제대로 전송되었지만, 결과를 받아보니 한글이 깨졌음.
이 문제 해결을 위해서는 아래처럼 하면 된다고 한다.
참조:
text를 네트워크를 통해서 쓸 때 EUC-KR로 변환해서 쏘아주고,
일반적으로 웹의 글을 가져올때는 테스트로 작성한 코드처럼 httpPost로 글을 가져오지 않고,
isStream으로 아래처럼 가져오므로, 이 때는 한글 변환에 문제가 없으리라 생각된다.
url에서 stream을 가져온후, post 방식으로 redirected된 url을 가져오던 소스의 bufferRead하던 부분과
조합해서 위의 인코딩을 잘 넣어보면 한글도 읽혀지지 않을까 싶다.
아래에서 싸이주소값을 가져올때는 한글이 깨졌었다.
/**
* url에서 이미지를 가져와서 sdcard에 저장하는 함수
* fullPath=urlPrefix + fileName
*
* @author wono77(2010.04.11)
* @param urlPrefix : "http://radstyle.net/images/cp/"
* @param fileName : a.jpg
*/
public void imageSaveFromURL(String urlPrefix, String fileName) {
String fullImageUrl = urlPrefix + fileName;
// String sdcardPath =
// Environment.getExternalStorageDirectory().toString();//+ "/sdcard/";
String sdcardFullPath = sdcardPath + fileName;
// url을 파일에 저장
InputStream is = null;
try {
is = getUrlStream(fullImageUrl);
} catch (Exception e1) {
// TODO Auto-generated catch block
e1.printStackTrace();
}
// directory 존재여부 체크 한번
File dir = new File(sdcardPath);
if (!dir.exists()) {
dir.mkdir();
}
if (is != null) {
try {
BufferedInputStream bis = new BufferedInputStream(is);
FileOutputStream fos = new FileOutputStream(new File(sdcardFullPath));
int n = 0;
try {
while ((n = bis.read()) != -1) {
fos.write(n);
}
} catch (IOException e) {
Log.v("a", "write fail");
} finally {
fos.close();
bis.close();
}
} catch (IOException e) {
Log.v("a", "fail");
}
}
}
/**
* url에서 inputStream을 받아오는 함수
*
* @author wono77(2010.04.11)
* @param path
* @return
* @throws Exception
*/
public InputStream getUrlStream(String path) throws Exception {
InputStream is = null;
try {
// 20100222 최원효 : timeout 셋팅
int desiredValue = 3000;
URL sourceImageUrl = new URL(path);
URLConnection t_connection = sourceImageUrl.openConnection();
t_connection.setConnectTimeout(desiredValue);
t_connection.setReadTimeout(desiredValue);
is = t_connection.getInputStream();
} catch (Exception e) {
if (is != null) {
is.close();
}
is = null;
}
return is;
}
/**
* url을 입력받아 direct 되는 url의 내용을 가져오는 함수
*
* @author wono77(2010.08.24)
* @param inputUrl
* @return
* @throws IOException
*/
public String getRedirectedUrlStream(String inputUrl) {
URL url = null;
String inputLine = "";
String response = "";
URLConnection conn = null;
try {
url = new URL(inputUrl);
conn = url.openConnection();
} catch (MalformedURLException e) {
// TODO Auto-generated catch block
e.printStackTrace();
} catch (IOException e) {
// TODO Auto-generated catch block
e.printStackTrace();
}
if (conn instanceof HttpURLConnection) {
HttpURLConnection httpConn = (HttpURLConnection) conn;
try {
httpConn.setRequestMethod("POST");
httpConn.setRequestProperty("Content-type", "text/xml");
httpConn.setUseCaches(false);
httpConn.setDoInput(true);
httpConn.setDoOutput(true);
String testxml = null;
DataOutputStream out;
out = new DataOutputStream(httpConn.getOutputStream());
out.flush();
out.close();
// This next line throws an IOException if response code is not
// 200 <<======<<
BufferedReader in = null;
in = new BufferedReader(new InputStreamReader(
httpConn.getInputStream()));
while ((inputLine = in.readLine()) != null) {
response = response + inputLine;
}
in.close();
} catch (ProtocolException e) {
// TODO Auto-generated catch block
e.printStackTrace();
} catch (IOException e) {
// TODO Auto-generated catch block
e.printStackTrace();
}
return response;
} else {
return null;
}
}
* 더 해볼 내용: 이미지 업로드
참고할것 :
* 참조한글:
1. 안드로이드 글쓰기 (외국글)
: http://blog.dahanne.net/2009/08/16/how-to-access-http-resources-from-android/
2. 안드로이드 이미지 업로드 with php
3. 초록돼지의 글 모음
: http://absenteye.blog.me/100110049502
4. 가장많이 참조한글
: http://www.shop-wiz.com/document/android/execise_linkage_web
이번장에서는 웹과의 데이타 교환에 대해 연속적으로 다루어 보겠습니다.
그 첫번째로 post/get 방식으로 웹에 데이타를 전달하고 결과치를 다시 받는 것을 처리하겠습니다.
일단 어플에서 불러올 php 파일을 작성하겠습니다.
이 php파일은 변수를 받아서 출력해주는 프로그램입니다.
android_post.php
1 2 3 4 5 6 | <?php $id = $_POST["user_id"] ; $pwd = $_POST["user_pwd"] ; echo "your id is ".$id." and your passwd is ".$pwd; ?> |
이제는 AndroidManifest.xml에서 인터넷에 대한 권한이 줍니다.
<uses-permission android:name="android.permission.INTERNET" />
1 2 3 4 5 6 7 8 9 10 11 12 13 14 15 16 17 18 | <?xml version="1.0" encoding="utf-8"?> package="com.ProjectLinkageWeb" android:versionCode="1" android:versionName="1.0"> <application android:icon="@drawable/icon" android:label="@string/app_name"> <activity android:name=".ProjectLinkageWeb" android:label="@string/app_name"> <intent-filter> <action android:name="android.intent.action.MAIN" /> <category android:name="android.intent.category.LAUNCHER" /> </intent-filter> </activity> </application> <uses-permission android:name="android.permission.INTERNET" /></manifest> |
그리고 main.xml 에서 두개의 입력박스와 하나의 출력박스, 그리고 버튼을 생성합니다.
1 2 3 4 5 6 7 8 9 10 11 12 13 14 15 16 17 18 19 20 21 22 23 24 25 26 27 28 29 30 31 32 33 34 35 36 37 38 39 40 41 42 43 44 45 | <?xml version="1.0" encoding="utf-8"?> android:orientation="vertical" android:layout_width="fill_parent" android:layout_height="fill_parent" ><TextView android:layout_width="fill_parent" android:layout_height="wrap_content" android:text="@string/hello" /><TextView android:layout_width="fill_parent" android:layout_height="wrap_content" android:text="Input Your Id" /> <EditText android:layout_width="fill_parent" android:layout_height="wrap_content" android:id="@+id/user_id" /> <TextView android:layout_width="fill_parent" android:layout_height="wrap_content" android:text="Input Your password" /> <EditText android:layout_width="fill_parent" android:layout_height="wrap_content" android:id="@+id/user_pwd" /> <TextView android:layout_width="fill_parent" android:layout_height="wrap_content" android:id="@+id/get_result" android:text="Result Field" /> <Button android:layout_width="fill_parent" android:layout_height="wrap_content" android:id="@+id/submitBtn" android:text="Submit" /> </LinearLayout> |
그리고 아래처럼... 별도의 설명은 드리지 않겠습니다.
소스가 어렵지 않으니 눈으로 따라 보시면 될것입니다.
1 2 3 4 5 6 7 8 9 10 11 12 13 14 15 16 17 18 19 20 21 22 23 24 25 26 27 28 29 30 31 32 33 34 35 36 37 38 39 40 41 42 43 44 45 46 47 48 49 50 51 52 53 54 55 56 57 58 59 60 61 62 63 64 65 66 67 68 69 70 71 72 73 74 75 76 77 78 79 80 81 82 83 84 85 86 87 88 89 90 91 92 93 94 95 96 97 98 99 100 | package com.ProjectLinkageWeb; import java.io.IOException;import java.io.UnsupportedEncodingException;import java.util.Vector; import org.apache.http.HttpEntity;import org.apache.http.NameValuePair;import org.apache.http.client.ClientProtocolException;import org.apache.http.client.HttpClient;import org.apache.http.client.ResponseHandler;import org.apache.http.client.entity.UrlEncodedFormEntity;import org.apache.http.client.methods.HttpGet;import org.apache.http.client.methods.HttpPost;import org.apache.http.client.utils.URLEncodedUtils;import org.apache.http.impl.client.BasicResponseHandler;import org.apache.http.impl.client.DefaultHttpClient;import org.apache.http.message.BasicNameValuePair; import android.app.Activity;import android.os.Bundle;import android.view.View;import android.widget.Button;import android.widget.EditText;import android.widget.TextView; public class ProjectLinkageWeb extends Activity { /** Called when the activity is first created. */ @Override public void onCreate(Bundle savedInstanceState) { super.onCreate(savedInstanceState); setContentView(R.layout.main); Button button = (Button) findViewById( R.id.submitBtn ) ; button.setOnClickListener(new View.OnClickListener() { public void onClick(View v) { String user_id = ((EditText) findViewById(R.id.user_id)).getText().toString() ; String user_pwd = ((EditText) findViewById(R.id.user_pwd)).getText().toString() ; TextView resultField = ( TextView ) findViewById( R.id.get_result ) ; try { //데이터를 웹서버에 보내고 받아온 결과를 출력합니다. resultField.setText( sendData( user_id, user_pwd ) ) ; } catch (ClientProtocolException e) { // TODO Auto-generated catch block e.printStackTrace(); } catch (IOException e) { // TODO Auto-generated catch block e.printStackTrace(); } } }); } private String sendData(String id, String pwd) throws ClientProtocolException, IOException { // TODO Auto-generated method stub // Get 방식일경우 //HttpPost request = makeHttpGet( id, pwd, "http://www.shop-wiz.com/android_post.php" ) ; HttpClient client = new DefaultHttpClient() ; ResponseHandler<STRING> reshandler = new BasicResponseHandler() ; String result = client.execute( request, reshandler ) ; return result ; } //Post 방식일경우 private HttpPost makeHttpPost(String user_id, String user_pwd, String url) { // TODO Auto-generated method stub HttpPost request = new HttpPost( url ) ; Vector<NAMEVALUEPAIR> nameValue = new Vector<NAMEVALUEPAIR>() ; nameValue.add( new BasicNameValuePair( "user_id", user_id ) ) ; nameValue.add( new BasicNameValuePair( "user_pwd", user_pwd ) ) ; request.setEntity( makeEntity(nameValue) ) ; return request ; } //Get 방식일경우 private HttpGet makeHttpGet(String user_id, String user_pwd, String url) { // TODO Auto-generated method stub Vector<NAMEVALUEPAIR> nameValue = new Vector<NAMEVALUEPAIR>() ; nameValue.add( new BasicNameValuePair( "user_id", user_id ) ) ; nameValue.add( new BasicNameValuePair( "user_pwd", user_pwd ) ) ; String my_url = url + "?" + URLEncodedUtils.format( nameValue, null) ; HttpGet request = new HttpGet( my_url ) ; return request ; } private HttpEntity makeEntity( Vector<NAMEVALUEPAIR> nameValue ) { HttpEntity result = null ; try { result = new UrlEncodedFormEntity( nameValue ) ; } catch (UnsupportedEncodingException e) { // TODO Auto-generated catch block e.printStackTrace(); } return result ; } } |

이 프로그램을 실행할때는 반드시 이클립스상에서 인터넷이 되는지 확인해야 합니다.
저의 경우는 아래와 같이 환경을 처리했습니다.

업로드 관련 추가글들: (파일로도 첨부합니다.)
http://blog.naver.com/legendx/40132716891 (여기가 젤 깔끔하게 정리 잘 된듯)
http://www.androidpub.com/?_filter=search&mid=android_dev_qna&search_target=title_content&search_keyword=post&page=4&division=-841993&last_division=-513271&document_srl=664496
'옛날' 카테고리의 다른 글
| Coach mark View [Android] (0) | 2015.12.11 |
|---|---|
| Webview 소스 [Android] (0) | 2015.12.11 |
| 네트워크 상태 [Android] (0) | 2015.12.11 |
| Tabhost custom [Android] (0) | 2015.12.11 |
| TabActivity back key Event [Android] (0) | 2015.12.11 |