
Github
데이터 다루기
라우팅 문서를 마지막까지 진행하고 나면 온라인 쇼핑몰 앱에는 제품 목록 화면과 제품 상세정보 화면이 존재합니다. 그래서 제품 목록 화면에서 사용자가 제품의 이름을 클릭하면 새로운 화면으로 전환되면서 제품의 상세정보를 확인할 수 있습니다. 이 때 URL도 변경됩니다.
이번 섹션에서는 장바구니 기능을 추가해봅시다. 이렇게 진행합니다:
-
제품 상세정보 화면에 "Buy" 버튼을 추가합니다. 이 버튼을 클릭하면 현재 화면에 표시된 제품을 장바구니 서비스에 추가합니다.
-
장바구니 컴포넌트를 추가합니다. 이 컴포넌트는 장바구니에 들어있는 제품 목록을 표시합니다.
-
배송 비용 안내 컴포넌트를 추가합니다. 이 컴포넌트는 Angular의 HttpClient 모듈을 사용해서 .json 파일에 있는 제품 배송 비용을 받아옵니다.
서비스(Services)
서비스는 Angular 애플리케이션에서 사용하는 데이터를 처리하는 객체입니다. Angular에서 서비스는 어떤 클래스의 인스턴스이며, Angular가 제공하는 의존성 주입 시스템을 사용해서 애플리케이션 어디에라도 자유롭게 사용할 수 있습니다.
서비스는 보통 애플리케이션 안에서 여러번 사용하는 데이터를 공유하는 용도로 사용합니다. 그래서 온라인 쇼핑몰이라면 장바구니 기능을 구현하기 위해 필요한 데이터와 메소드를 장바구니 서비스로 구현할 수 있습니다.
장바구니 서비스 생성하기
지금까지 앱을 구현하면서 사용자가 제품의 정보를 확인하고, 공유하거나, 제품 가격이 변동되었을 때 알림을 받는 동작을 가상으로 구현해봤습니다. 아직까지 제품 구매 기능은 없습니다.
이 섹션에서는 제품 상세정보 페이지에 "Buy" 버튼을 추가할 것입니다. 그리고 장바구니에 제품을 추가하기 위해 장바구니 서비스도 만들어 봅시다.
서비스 정의하기
1.장바구니 서비스를 생성합니다.
-
app 폴더에 마우스 오른쪽 버튼을 클릭하고 Angular Generator를 선택합니다. 그리고 **Service**를 선택하고 cart라는 이름으로 서비스를 생성합니다.
src/app/cart.service.ts
import { Injectable } from '@angular/core';

@Injectable({
  providedIn: 'root'
})
export class CartService {

  constructor() {}

}-
동으로 생성된 @Injectable() 데코레이터에 { providedIn: 'root' } 구문이 없다면 위 예제 코드처럼 추가해 줍니다.
2.장바구니에 담길 제품 목록을 저장하기 위해 CartService 클래스에 items 프로퍼티를 선언합니다.
export class CartService {
  items = [];
}
3. 제품을 장바구니에 추가하는 메소드, 장바구니 목록을 반환하는 메소드, 장바구니를 비우는 메소드를 추가합니다
export class CartService {
  items = [];

  addToCart(product) {
    this.items.push(product);
  }

  getItems() {
    return this.items;
  }

  clearCart() {
    this.items = [];
    return this.items;
  }
}
서비스 활용하기
이번 섹션에서는 제품 상세정보 컴포넌트에서 장바구니 서비스를 활용할 수 있도록 수정해 봅시다. 제품 상세정보 화면에 "Buy" 버튼을 추가한 후에, 사용자가 이 버튼을 클릭하면 현재 화면에 표시된 상품을 장바구니에 추가하는 기능을 구현합니다.
1. product-details.component.ts 파일을 엽니다.
2. 컴포넌트가 장바구니 서비스에 접근할 수 있도록 설정합니다.
-
장바구니 서비스를 로드합니다.
src/app/product-details/product-details.component.ts
import { Component, OnInit } from '@angular/core';
import { ActivatedRoute } from '@angular/router';

import { products } from '../products';
import { CartService } from '../cart.service';-
그리고 이 서비스를 컴포넌트에 의존성으로 주입합니다.
export class ProductDetailsComponent implements OnInit {
  constructor(
    private route: ActivatedRoute,
    private cartService: CartService
  ) { }
}
3. 현재 화면에 표시된 제품을 장바구니에 담을 수 있도록 addToCart() 메소드를 정의합니다.
addToCart() 메소드는
-
현재 할당된 product 객체를 인자로 받습니다.
-
제품을 장바구니에 넣기 위해 장바구니 서비스의 addCart() 메소드를 실행합니다.
-
제품이 장바구니에 담겼다는 메시지를 표시합니다.
export class ProductDetailsComponent implements OnInit {
  addToCart(product) {
    window.alert('Your product has been added to the cart!');
    this.cartService.addToCart(product);
  }
}
4. 그리고 제품 상세정보 템플릿에 "Buy" 버튼을 추가합니다. 사용자가 이 버튼을 클릭하면 제품을 장바구니에 담을 것입니다.
-
product-details.component.html 파일을 엽니다.
-
"Buy" 라고 적힌 버튼을 추가하고 이 버튼에서 발생하는 click 이벤트를 addToCart() 메소드와 바인딩합니다:
src/app/product-details/product-details.component.html
<h2>Product Details</h2>

<div *ngIf="product">
  <h3>{{ product.name }}</h3>
  <h4>{{ product.price | currency }}</h4>
  <p>{{ product.description }}</p>

  <button (click)="addToCart(product)">Buy</button>
</div>
"Buy" 버튼이 추가된 것을 확인하려면 애플리케이션을 새로고침한 후에 제품 목록에서 제품 이름을 클릭해서 상세정보 화면을 표시하면 됩니다.

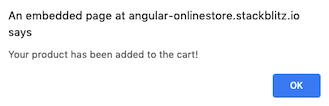
이제 "Buy" 버튼을 클릭하면 제품이 장바구니에 들어가고 다음과 같은 안내 메시지가 표시됩니다.
장바구니 화면 만들기
지금까지 작성한 앱에서 사용자가 "Buy" 버튼을 클릭하면 현재 화면에 표시된 제품이 장바구니에 추가되지만, 아직 장바구니 목록을 볼 수 있는 화면은 없습니다.
이번에는 장바구니 화면을 만들어 봅시다:
-
장바구니 컴포넌트를 만들고 이 컴포넌트로 라우팅하는 규칙을 추가합니다. 아직까지 장바구니 페이지에는 기본으로 생성된 문자열만 존재합니다.
-
이 화면에 장바구니에 담긴 아이템을 표시합니다.
컴포넌트 준비하기
장바구니 화면은 제품 상세정보 컴포넌트를 만들었던 것과 동일한 과정으로 생성합니다.
-
cart 라는 이름으로 장바구니 컴포넌트를 생성합니다.
리마인드: 파일 목록에서 app 폴더에 마우스 오른쪽 버튼을 클릭하고 Angular Generator를 선택한 후에 Component를 선택하면 됩니다.
src/app/cart/cart.component.ts
import { Component, OnInit } from '@angular/core';

@Component({
  selector: 'app-cart',
  templateUrl: './cart.component.html',
  styleUrls: ['./cart.component.css']
})
export class CartComponent implements OnInit {

  constructor() { }

  ngOnInit() {
  }

}
2. 장바구니 컴포넌트로 연결되는 라우팅 규칙을 추가합니다.
리마인드: app.module.ts 파일을 열고 CartComponent 컴포넌트를 가리키는 라우팅 규칙을 추가합니다. 이 때 path 값은 cart로 지정 합니다.
@NgModule({
  imports: [
    BrowserModule,
    ReactiveFormsModule,
    RouterModule.forRoot([
      { path: '', component: ProductListComponent },
      { path: 'products/:productId', component: ProductDetailsComponent },
      { path: 'cart', component: CartComponent },
    ])
  ],
3. 이제 장바구니 컴포넌트를 확인하려면 화면에서 "Checkout" 버튼을 클릭하면 됩니다. 그러면 컴포넌트가 생성되면서 함께 생성된 문구 "cart works!"가 표시되면서 주소는 /cart로 변경됩니다. 이 때 getting-started.stackblitz.io는 StackBlitz 프로젝트 이름에 따라 달라질 수 있습니다.
(참고: 맨 위쪽 영역에 있는 "Checkout" 버튼은 routerLink를 사용해서 /cart로 이동하도록 미리 작성해두었다고 가정합시다.)

장바구니에 담긴 제품 목록 표시하기
일반적으로 서비스는 컴포넌트끼리 데이터를 공유하는 용도로 사용합니다:
-
제품 상세정보 컴포넌트는 이미 장바구니 서비스(CartService)를 활용하고 있습니다.
-
이번 섹션에서는 장바구니에 담긴 제품 목록을 표시하도록 장바구니 컴포넌트를 수정해 봅시다.
1. cart.component.ts 파일을 엽니다.
2. 컴포넌트가 장바구니 서비스를 사용할 수 있도록 의존성으로 주입합니다. (위에서 제품 상세정보 컴포넌트에 장바구니 서비스를 의존성으로 주입했던 과정과 동일합니다.)
src/app/cart/cart.component.ts
-
cart.service.ts 파일에 있는 CartService를 로드합니다.
import { Component } from '@angular/core';
import { CartService } from '../cart.service';
-
장바구니에 담긴 목록을 가져오기 위해 CartService를 컴포넌트에 의존성으로 주입합니다.
export class CartComponent {

  constructor(
    private cartService: CartService
  ) { }
}
3. 장바구니에 담긴 제품 목록을 저장할 items 프로퍼티를 선언합니다.
export class CartComponent {
  items;

  constructor(
    private cartService: CartService
  ) { }
}
4. 장바구니 서비스의 getItems() 메소드를 사용해서 장바구니에 담긴 제품 목록을 가져옵니다. (이 메소드는 cart.service.ts를 생성했을 때 정의했습니다.)
export class CartComponent {
  items;

  constructor(
    private cartService: CartService
  ) {
    this.items = this.cartService.getItems();
  }
}
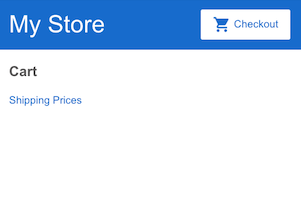
5. 템플릿에 "Cart" 헤더를 추가하고 <div> 엘리먼트에 *ngFor를 사용해서 장바구니에 담긴 아이템을 모두 화면에 표시합니다.
CartComponent 템플릿을 다음과 같이 수정하면 됩니다:
src/app/cart/cart.component.html
<h3>Cart</h3>

<div class="cart-item" *ngFor="let item of items">
  <span>{{ item.name }} </span>
  <span>{{ item.price | currency }}</span>
</div>
6. 장바구니 컴포넌트가 동작하는 것을 확인해 봅시다.
-
"My Store"를 클릭하면 제품 목록 화면으로 이동합니다.
-
제품 이름을 클릭하면 제품 상세정보 화면으로 이동합니다.
-
"Buy" 버튼을 누르면 제품을 장바구니에 추가합니다.
-
"Checkout" 버튼을 클릭하면 장바구니 화면으로 이동합니다.
-
다른 제품을 장바구니에 추가하려면 "My Store"를 클릭해서 제품 목록 화면으로 돌아가면 됩니다. 이 과정을 반복해 보세요.

배송 비용 정보 받아오기
서버에서 받아오는 데이터는 스트림 형태일 때도 있습니다. 이 때 스트림 데이터는 중간에 다른 형태로 변환해서 원하는 곳에 전달할 수 있기 때문에 자주 사용됩니다. Angular 애플리케이션에서는 Angular가 제공하는 HTTP 클라이언트 (HttpClient)를 사용해서 외부에서 데이터를 받아오고 스트림 형태로 전달할 수 있습니다.
이번 섹션에서는 외부 파일에 있는 배송 비용 데이터를 HTTP 클라이언트로 받아와 봅시다.
배송 비용 데이터
이 섹션을 진행하기 위해 필요한 배송 비용 데이터는 assets/shipping.json 파일에 저장되어 있습니다. 이 데이터를 가져와서 장바구니에 담긴 제품의 배송 비용을 표시해 봅시다.
src/assets/shipping.json
[
  {
    "type": "Overnight",
    "price": 25.99
  },
  {
    "type": "2-Day",
    "price": 9.99
  },
  {
    "type": "Postal",
    "price": 2.99
  }
]
HttpClient 활성화하기
Angular가 제공하는 HTTP 클라이언트를 사용하려면 애플리케이션에 HttpClientModule을 로드해야 합니다.
앱에 HttpClientModule을 등록하면 앱 어디에서도 HttpClient 서비스를 의존성으로 주입해서 사용할 수 있도록 프로바이더도 자동으로 등록합니다. 그래서 외부 데이터를 가져와야 하는 서비스가 있다면 이 HttpClient 서비스를 의존성으로 주입한 후에 HttpClient 서비스가 제공하는 API를 사용해서 데이터를 받아오면 됩니다.
-
app.module.ts 파일을 엽니다.
이 파일에는 앱 전역에 사용할 모듈을 등록합니다.
-
@angular/common/http 패키지에 있는 HttpClientModule을 로드합니다.
import { NgModule } from '@angular/core';
import { BrowserModule } from '@angular/platform-browser';
import { RouterModule } from '@angular/router';
import { HttpClientModule } from '@angular/common/http';
import { ReactiveFormsModule } from '@angular/forms';

import { AppComponent } from './app.component';
import { TopBarComponent } from './top-bar/top-bar.component';
import { ProductListComponent } from './product-list/product-list.component';
import { ProductAlertsComponent } from './product-alerts/product-alerts.component';
import { ProductDetailsComponent } from './product-details/product-details.component';

@NgModule({
  imports: [
    BrowserModule,
    HttpClientModule,
    ReactiveFormsModule,
    RouterModule.forRoot([
      { path: '', component: ProductListComponent },
      { path: 'products/:productId', component: ProductDetailsComponent },
      { path: 'cart', component: CartComponent },
    ])
  ],
  declarations: [
    AppComponent,
    TopBarComponent,
    ProductListComponent,
    ProductAlertsComponent,
    ProductDetailsComponent,
    CartComponent,
  ],
  bootstrap: [
    AppComponent
  ]
})
export class AppModule { }
장바구니 서비스에서 HttpClient 활용하기
1. cart.service.ts 파일을 엽니다.
2. 그리고 @angular/common/http 패키지에 있는 HttpClient 심볼을 로드합니다.
src/app/cart.service.ts
import { Injectable } from '@angular/core';

import { HttpClient } from '@angular/common/http';
3. HttpClient를 CartService 클래스에 의존성으로 주입합니다:
export class CartService {
  items = [];

  constructor(
    private http: HttpClient
  ) {}
}
get() 메소드 정의하기
위에서 구현한 것처럼, 컴포넌트들은 같은 서비스를 함께 사용할 수 있습니다. 그래서 나중에 나오는 배송 비용 안내 컴포넌트에서도 장바구니 서비스를 사용하며, HTTP 통신으로 shipping.json 파일에서 배송 비용 데이터를 가져오는 용도로 사용할 것입니다. 지금은 get() 메소드를 정의해 봅시다.
-
cart.service.ts 파일을 계속 수정합니다.
-
clearCart() 메소드 아래에 getShippingPrices() 메소드를 추가하고 외부 데이터를 가져오기 위해 HttpClient#get() 메소드를 사용하도록 다음과 같이 작성합니다:
src/app/cart.service.ts
export class CartService {
  items = [];

  constructor(
    private http: HttpClient
  ) {}

  addToCart(product) {
    this.items.push(product);
  }

  getItems() {
    return this.items;
  }

  clearCart() {
    this.items = [];
    return this.items;
  }

  getShippingPrices() {
    return this.http.get('/assets/shipping.json');
  }
}
배송 비용 안내 페이지 만들기
Angular 앱은 이제 배송 비용 데이터를 가져올 수 있습니다. 배송 비용 안내 컴포넌트를 만들어 봅시다.
1. shipping이라는 이름으로 새로운 컴포넌트를 생성합니다.
리마인드: 파일 목록의 app 폴더에 마우스 오른쪽 버튼을 클릭하고 Angular Generator를 선택한 후에 Component를 선택합니다.
src/app/shipping/shipping.component.ts
import { Component, OnInit } from '@angular/core';

@Component({
  selector: 'app-shipping',
  templateUrl: './shipping.component.html',
  styleUrls: ['./shipping.component.css']
})
export class ShippingComponent implements OnInit {

  constructor() { }

  ngOnInit() {
  }

}
2. app.module.ts 파일에 배송 비용 안내 페이지에 해당하는 라우팅 규칙을 추가합니다. path를 shipping으로 지정하고 ShippingComponent와 연결하면 됩니다.
src/app/app.module.ts
@NgModule({
  imports: [
    BrowserModule,
    HttpClientModule,
    ReactiveFormsModule,
    RouterModule.forRoot([
      { path: '', component: ProductListComponent },
      { path: 'products/:productId', component: ProductDetailsComponent },
      { path: 'cart', component: CartComponent },
      { path: 'shipping', component: ShippingComponent },
    ])
  ],
  declarations: [
    AppComponent,
    TopBarComponent,
    ProductListComponent,
    ProductAlertsComponent,
    ProductDetailsComponent,
    CartComponent,
    ShippingComponent
  ],
  bootstrap: [
    AppComponent
  ]
})
export class AppModule { }
새로 만든 배송 비용 안내 컴포넌트는 아직 다른 컴포넌트 어디에도 사용되지 않았지만, 배송 비용 안내 컴포넌트에 해당하는 URL을 입력하면 이 컴포넌트가 동작하는 것을 미리보기 화면으로 확인할 수 있습니다. URL을 /shipping처럼 입력하면 됩니다.
3. shipping.json 파일에 있는 데이터를 HTTP 통신으로 가져오기 위해 장바구니 서비스를 배송 비용 안내 컴포넌트에 의존성으로 주입합니다.
장바구니 서비스를 로드합니다.
src/app/shipping/shipping.component.ts
import { Component } from '@angular/core';

import { CartService } from '../cart.service';
shippingCosts 프로퍼티를 선언합니다.
export class ShippingComponent {
  shippingCosts;
}
ShippingComponent 클래스에 장바구니 서비스를 의존성으로 주입합니다:
constructor(private cartService: CartService) {
}
장바구니 서비스에 있는 getShippingPrices()를 실행한 결과를 shippingCosts 프로퍼티에 할당합니다.
export class ShippingComponent {
  shippingCosts;

  constructor(private cartService: CartService) {
    this.shippingCosts = this.cartService.getShippingPrices();
  }
}
4. 서비스에서 가져온 데이터를 async 파이프로 컴포넌트 템플릿에 표시합니다:
src/app/shipping/shipping.component.html
<h3>Shipping Prices</h3>

<div class="shipping-item" *ngFor="let shipping of shippingCosts | async">
  <span>{{ shipping.type }} </span>
  <span>{{ shipping.price | currency }}</span>
</div>
5. 배송가격 안내 화면으로 이동하는 링크를 장바구니 페이지에 추가합니다:
src/app/cart/cart.component.html
<h3>Cart</h3>

<p>
  <a routerLink="/shipping">Shipping Prices</a>
</p>

<div class="cart-item" *ngFor="let item of items">
  <span>{{ item.name }} </span>
  <span>{{ item.price | currency }}</span>
</div>
배송 비용이 제대로 표시되는 것을 확인해 보세요
장바구니에 담긴 제품 목록을 확인하려면 "Checkout" 버튼을 클릭하면 됩니다. (앱 코드를 수정하면 미리보기 화면이 갱신되면서 장바구니 목록이 초기화된다는 것을 잊지마세요.)
이제 Shipping Prices 링크를 클릭하면 화면이 전환됩니다.

'옛날' 카테고리의 다른 글
| 개인정보 처리방침 (0) | 2020.05.08 |
|---|---|
| Angular 튜토리얼 4 (0) | 2020.02.24 |
| Angular 튜토리얼 2 (0) | 2020.02.19 |
| Angular 튜토리얼 1 (0) | 2020.02.18 |
| 포르쉐 다이캐스트 (0) | 2020.01.14 |


